
Introduction
In the previous article we used ReactJs and the registerSidebar helper function to add a sidebar to the Gutenberg editor. In this article we are going to add some form field components for Browser title, Meta description and the Robots tag so we can actually edit our Seo meta data.
Adding Browser title.
First up is the Browser title field. Below you can see the edited sidebar.js file.
Here we import a component called BrowserTitleField from a file called BrowserTitleField.js. And in the render method notice that we removed the h3 that was there and now render the imported BrowserTitleField component.
Now that’s all nice and dandy but we don’t have this file/component yet, so lets create that first.
Browser title component.
Imports
In the src/js/components directory create a file called BrowserTitleField.js and paste the code snippet below into the newly created file.
To start of our component we again first need to import a couple of things. Here we import:
- React: Needed to create our class componentn.
- __(): A helper function for internationalization.
- compose: A helper function to compose store aware components.
- withDispatch: A helper function to change data in the store.
- withSelect: A helper function to get data from the store.
- TextControl: The gutenberg text field component.
Don’t worry about these things to much yet, we’ll get to all of them.
Class component
For the Browser title field we are again going to create a Class Component. Edit the BrowserTitleField.js file to add the class like shown below.
We create a class called BrowserTitleField witch extends the react.component class. and we give it a constructor method that calls the constructor on its parent class. And we add a render method that, for now, renders a div with a class of metatags-browser-title-field.
TextControl
Now that we have the basics for our new component, it’s time to add the actual Text-Control component from the wp.components package. Note that we imported this component at the top of the file.
The text-control component can except 7 props, but here we are only interested in three of them:
- label: A value for the label element.
- value: The value for the input field.
- onChange: A function to call when the value changes.
For the label we pass “Browser title” using the __() helper function. This text will appear above the input field.
For the value and onChange props we are going to need a prop and a method to call. but we don’t have these in our component yet. For this we are going to use the compose helper function that will create these for us.
Getting data
The Gutenberg editor, like many large React projects, keeps al of it’s data in a central location called a Store.
Stores or Redux State Management in React is a pretty complex/confusing subject if you have never dealt with them before. I can really recommend you check out “React Redux Tutorial for Beginners: The Definitive Guide (2019)“. Although Gutenberg’s implementation of Redux is a little bit different then plain Redux this tutorial should give you a pretty good grasp of it’s concepts.
To put it very simple just think of a Store as a reactive javascript object that holds data, and provides methods to get and put data in and out of it.
In our case we added a couple of meta fields to the post object in the first article, and the values of these meta fields (which are all empty at this point) are all kept inside the core/editor Store.
Compose
To get to the values stored in the core/editor Store and to update them if needed we are going to use the Compose helper function. To put it quite simple the Compose helper takes our component and creates (composes) a new version of that component and adds props and methods, that are tied into the Store, to the component that are defined within the compose function.
This may sound complex, but lets just look at some code and hopefully it will make sense.
Below the class in the BrowserTitleField.js file add the following code.
In this code snippet we export the return value of the Compose helper. We pass an array holding two functions. And we bind our BrowserTitleField component to the Compose function.
The goal of the compose function is to add props and methods to our component that are tied into the store. These props and methods are created by the withDispatch and withSelect functions inside the array we pass to compose. But at this point these two functions only return a empty object. So let’s fix that.
withDispatch
In the first article we registered three meta fields with WordPress. One of these is called metatags_browser_title. This is the post meta field that will hold (Stored in the post_meta database table) our browser title. Within Gutenberg the value of this meta field is stored within the core/editor store.
If we want to change it’s value we use the compose function to add a method to our component that has access to this value in the Store.
Update the return value of the withDispatch function like shown below.
Note that we added a function called setMetaFieldValue to the object that gets returned by the withDispatch function. This will add a this.props.setMetaFieldValue method to our component that we can use.
Data inside a Store can’t be changed directly but can only be accessed through a action. Actions are predefined methods located in the store that can change the data inside of it.
Inside this setMetaFieldValue function we use the dispatch function to dispatch an action to the core/editor store. In this case we dispatch a editPost action and we give it a object telling that we want to change a meta field with the name of metatags_browser_title and we want to set it to value.
So what is value going to be? Remember that the setMetaFieldValue method will be added to our component. Later on we will pass it to the onChange prop of the text-control component. So the value passed to setMetaFieldValue will be the value of the actual input field.
withSelect
So we now have a method that can update the meta value, but we also need something to get the value from the Store. For this we use the withSelect function within the reduce function.
Change the browserTitleField.js file to reflect the changes below.
Here we return a metaFieldValue variable, and use the select function to select the core/editor store again. And then we use getEditedPostAttribute to get to the metatags_browser_title meta field.
Basically all you need to understand here is that with this piece of code we create a metaFieldValue prop inside our component that gets updated whenever the metatags_browser_title value changes inside the store.
Putting it all together.
We have created quite a bit of code to get values from the Gutenberg store. But we still need to wire this all up with our component.
Change the BrowserTitleField class component to reflect the changes below.
With the compose function we added a setMetaFieldValue method to our component that can update the value inside the store. And we added a metaFieldValue prop to get the value from the store.
In the code above we pass the metaFieldValue prop to the value prop of the TextControl as this.props.metaFieldValue And we pass the setMetaFieldValue method to the onChange prop as this.props.setMetaFieldValue.
Note/Remember that we didn’t physically create these props on our BrowserTitleField component, but that we added these using the compose function, that creates a new version of our component with the extra props that get created within the withDispatch and withSelect functions.
Again Stores in React is a pretty confusing subject, but if you made it this far i hope you at least get what we did here.
Importing the field.
Now that we have our BrowserTitleField component we can add it to our sidebar. Change the sidebar.Js file to reflect the changes below.
Here we add a extra import statement and import the BrowserTitleField component from the BrowserTitleField.js file.
We then replace the H3 element we had in our render method with the newly imported BrowserTitleField component.
Meta description field
For the mete description field we need to create a new file called MetaDescriptionField.js and copy paste the code below.
The MetaDescriptionField component is nearly identical to the BrowserTitleField one. The differences are:
- At the top we import the TextareaControl component instead of the TextControl one because we need a textarea here.
- The class component gets the name MetaDescriptionField.
- In the render method we now render a TextareaControl instead of a TextControl.
- And in the compose function we reference the metatags_description_field meta field.
Meta Robots Field
For the meta Robots field we need to create a new file called MetaRobotsField.js and add the code shown below.
Again this file is very similar to the other components.
- Here we import a RadioControl component.
- We call our class component MetaRobotsField.
- In the render method we render a RadioControl with some options.
- And in the compose function we reference the metatags_robots_field meta field.
Note that for the value of the RadioControl we check if the value of the this.props.metaFieldValue prop. If it exists we pass that as the value. If it’s empty, thus not set yet, we pass the default value of “index, follow”.
Completing the sidebar
Now that we have all three of our form field components we can complete our sidebar.js. Change the content of the sidebar.js file to reflect the changes below.
Besides the BrowserTitleField we now also import the MetaDescriptionField and MetaRobotsField components and add them to the render method.
Persisting data.
Because we use the internal data storage of Gutenberg, the core/editor store, we have the advantage that we don’t need to implement any code to persist our data to the database. When the user clicks “save post” Gutenberg will automatically take the changes to our custom SEO data and persist it to the database.
Testing the plugin
To test our plugin we can move our terminal to the root of our plugin and run the Laravel Mix command again.
$ npm run devIf there are no errors you can go to any post edit screen that has the Gutenberg editor and you should see the plugin like shown below.
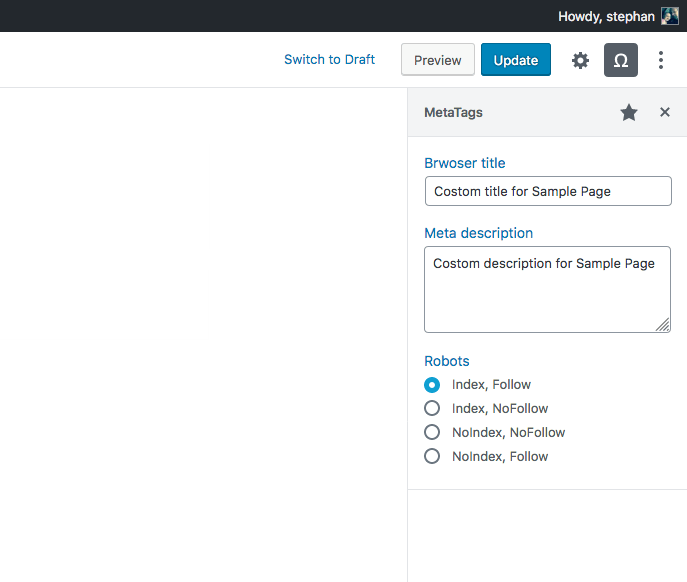
You should now be able to edit/change the values of the fields, and when you save the post and refresh the data should persist.
If you don’t get this result. Please check this Github Repositorie of the finished project to check if you missed something along the way..
Moving forward
That’s it for adding the form field components to our plugin. This also completes the javascript part of our work. In the next and final article in this series we will make some final changes to our Php code to output our data to the head of our webpages.
Follow me on twitter @Vanaf1979 or on Dev.to @Vanaf1979 to be notified about the next article in this series, and other WordPress related stuff.
If you have any questions or want to leave a comment, please visit the copy of this article on Dev.to.
Thanks for reading.