
Introduction
In the previous article we finished setting up the assets bundling with Laravel Mix. The next step is to start adding some Javascript code to actually register our plugin with the Gutenberg block editor.
Since Gutenberg is build using ReactJs, creating a plugin is also gonna require us to code using this framework. If you are unfamiliar with React I can highly recommend you take the Learn React for free course by Bob Ziroll on Scrimba. But if you are sufficiently skilled with vanilla Javascript in general, you should be able to follow along.
Now lets get to the fun part 🙂
Import registerPlugin
To register our plugin Gutenberg provides a nice helper function called, you guessed it, registerPlugin! But before we can use it, we have to import it.
Open up the src/js/metatgs.js file, remove any code we put there for testing purposes, and add the code snippet below.
Here we use Javascript object destructuring to get the registerPlugin function from the wp.plugins package.
Now you may remember we passed some dependencies when we enqueued the metatags.js file with Php in the first article. These dependencies include the Gutenberg packages like the wp.plugins one we are using here.
Calling registerPlugin
Now that we have a reference to the registerPlugin function lets put it to some use. Edit the metatags.js file to reflect the changes below.
The registerPlugin function takes a couple of parameters being:
- name: A string identifying the plugin. Must be unique across all registered plugins.
- settings: The settings for this plugin.
- settings.icon: An icon to be shown in the UI.
- settings.render: A component containing the UI elements to be rendered.
In our case we are passing “metatags” as the name of our plugin, and then a object for the settings.
For the icon setting we give it the ‘editor-customchar‘ string. This is a build-in icon provided by the WordPress dashicons. You could also pass it a custom icon of your own. We’re not gonna use a custom icon in this article but if you would like to know how, please check out my article “Adding custom svg icons to your Gutenberg blocks/plugin.“.
Finally we have to pass a component for our sidebar to the render setting. But before we can do that we have to create one first.
Creating the sidebar Component
In the src/js directory create a new directory called components. and inside create a new file called sidebar.js. Copy the code below into the new sidebar.js file.
In the code above we import the components we need:
- React: We need the React.Component to extend our class and create a new class component.
- __: This is a helper function, from the wp.i18n package, that allows for string translation/internationalization.
- Fragment: React doesn’t allow sibling elements to be rendered, so we need something to wrap them in. You could use a Div but Gutenberg provides a nice Fragment component for this.
- PluginSidebarMoreMenuItem: A component to render a menu item in the Gutenberg More menu.
- PluginSidebar: A component that will hold the actual Html for the sidebar.
Class component:
To create the sidebar component were going to use a React Class component. I realize that nowadays it’s all about functional components in React. But I’m a object oriented guy. so i feel that class components are easier to explain. If you know a little bit about React, you should be able to refactor this into a functional component.
Add the code below to the sidebar.js file.
We create our class extending the react.component class, and give it two methods.
- The constructor method which just calls the constructor on the parent class.
- The render method which will render the react components that will make up the sidebar.
In the render method we render a fragment since we need to render two components side by side. Like i said React doesn’t allow the rendering of sibling elements/components so we need to wrap them.
At the end of the file we export the component so we can import it later.
Plugin Sidebar More Menu Item:
Next we need a item for the “More” menu. Edit the sidebar.js file to reflect the changes below.
Here we add a PlinSidebarMoreMenuItem component to the Fragment. The PlinSidebarMoreMenuItem component will be placed inside the “More Menu” of the editor by the Slot/Fill components. This simply means that in the More Menu there is a “Slot” (Space) for menu items which will be “Filed” with our Menu Item.
We provide our menu item with:
- Target: This property has to reference the name we will give to our PluginSideBar component. in this case “metatags-sidebar”.
- Icon: The icon we want to use in the More Menu. We again use the editor-customchar icon like we did for the entire plugin.
And inside we menu item we render the name of our plugin using the __() helper.
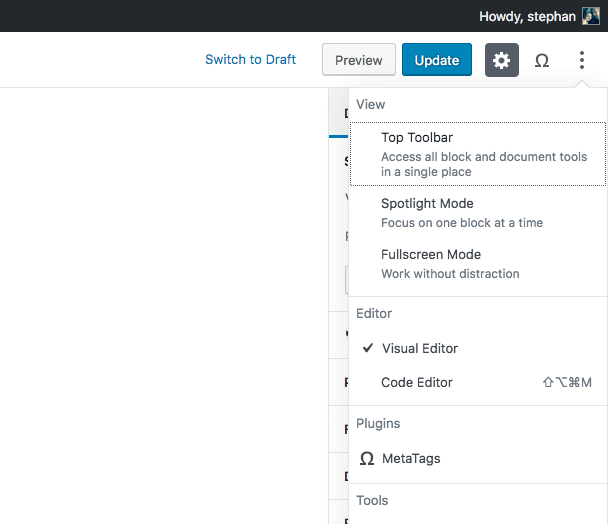
The menu item will look something like the menu shown below in the plugins section.
Plugin Sidebar:
We then need to add the actual sidebar component. Change the sidebar.js file to reflect the changes below.
In the code above we add a PluginSidebar component and provide it with:
- Name: A unique name representing our sidebar. This name has to match the Target property of the PluginSidebarMoreMenuItem. So we again pass “metatags-sidebar”.
- Title: A title that will be shown at the top of our sidebar . We again use the __() helper for this.
And inside the PluginSidebar we render a div with the class name metabox-sidebar-content, Later on we’ll fill the div with some useful form elements but for now we add a simple h3 with the name of our plugin.
Completed component.
Below is the semi completed sidebar component.
Importing the sidebar component
Now that we have our SideBar component we can pass it to the registerSidebar function. Edit the Metatags.js file to reflect the changes below.
Here we simply import the new sidebar component, and then we pass it to the registerPlugin function.
Testing the sidebar plugin.
We can now test our plugin. Lets move our terminal to the root of our plugin and run the following command:
$ npm run devNote: Check out the previous article where I explain the Laravel Mix Npm commands we set up.
If the terminal doesn’t give any errors you can go and visit any editor page that has the Gutenberg editor. Click the Omega sign at the top right and you should have a result similar the the image below.
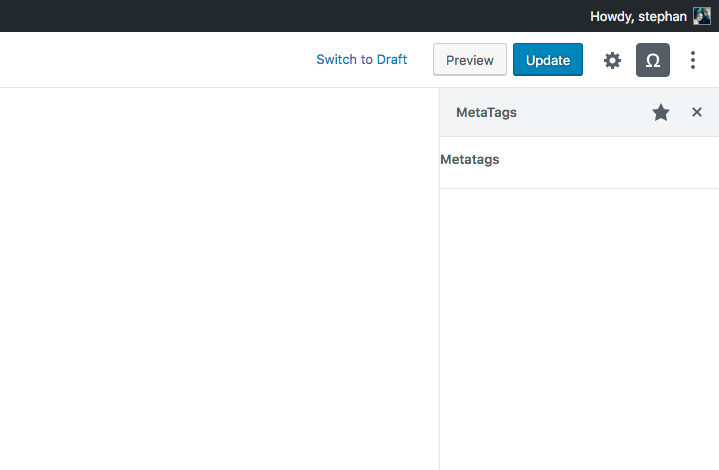
If you don’t get this result. Please check this Github Repositorie of the finished project to check if you missed something along the way..
Some styles
To finish up for now we can add a little style to give our sidebar a little padding. Open up the src/scss/metatags.scss file and copy the code snippet below.
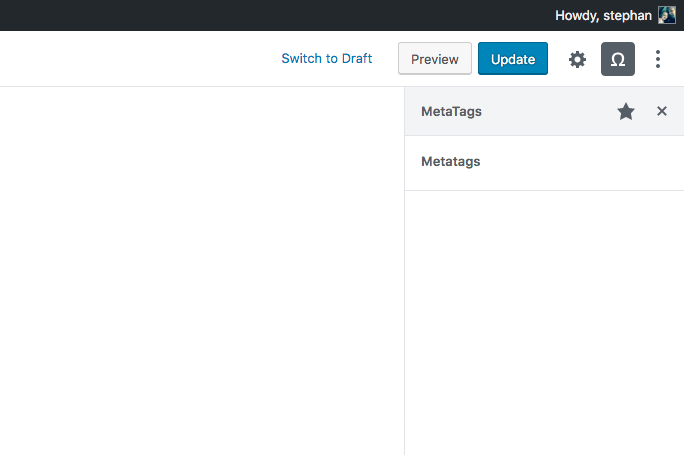
Remember that we gave the div element in the sidebar a class of metabox-sidebar-content!? Here we add a padding of 10px on all four sides.
Run the npm run dev command again:
$ npm run devNow refresh the editor page and you should see the padding reflected in the UI.
Again if you ran into an error you can check this Github Repositorie of the finished project to check if you missed something along the way..
Moving forward
That’s it for registering the plugin with Gutenberg and setting up the sidebar. In the next article we will start with filling our sidebar with form elements.
If you want you can check out my article: Adding custom svg icons to your Gutenberg blocks/plugin to see if you can give the plugin a custom icon.
Follow me on twitter @Vanaf1979 or on Dev.to @Vanaf1979 to be notified about the next article in this series, and other WordPress related stuff.
If you have any questions or want to leave a comment, please visit the copy of this article on Dev.to.
Thanks for reading.